The First Thing To Do With Your New WordPress Site
So you are about to kick of your brand new website and you’ve chosen WordPress for the Content Management System (CMS) for that site. What’s the first thing that you should do? Sure, you’ve been looking through templates, and you’re ready to get started, but the first thing that you should do is head on over to plugins and pick up an Under Construction plugin.
I have used Under Construction by Noah Kagan on my last couple of projects and it more than fits the bill. The reason for running a plugin like this is that you’re going to want to control your website’s release, and you won’t want visitors seeing the site as you work to get off the ground. Plus, you’ll want to schedule a few posts before you’re launch so that you can have a buffer for those times when you can’t write. So an Under Construction plugin will let you hide behind the curtain until you’re ready.
How to Install and Configure Under Construction
Installation
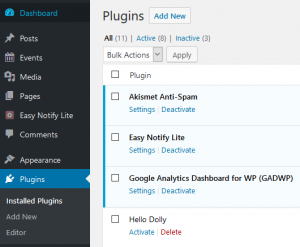
 First, navigate to the plugins menu. Here you will see all the plugins that are currently available to your WordPress installation. If this is your first time installing WordPress, or a new installation, there won’t be much here. As plugins are installed, they will appear here. You will now if they are active by the fact that they are highlighted– in the case of the example on the right, they are highlighted in blue.
You will see that up near the word Plugins is a button called “Add New”. This will open up a window that will let you search for plugins that WordPress knows about from their directory. The Under Construction plugin mentioned above comes from the WordPress directory, so typing in the text “Under Construction” and pressing enter in the search box should reveal the plugin you are looking for.
Verify that it is the plugin by looking at the author and select “Install”. After the plugin has been installed, you will have a link to activate. Go ahead and activate the plugin now.
Configuration
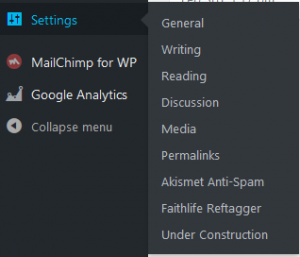
 Once this is done, head over to settings and find Under Construction and it should bring you to the configuration section for the plugin. Start by turning the plugin on by selecting “On” under Activate/Deactivate.
I would leave the HTTP status code alone, though if you want your site to report that it is not found or redirect to another site while configuring your site, one of these options would do that.
Next, you can choose what logged in users can see the site as a work in progress instead of getting the Under Construction page. I typically leave this at all users because that is what you’ll want to use to let you end user see what their site looks like.
The IP addresses listed in the next box will be able to see your site and not the Under Construction page. The handy “Add Current Address” will mean that any users at your physical location will be able to see the site to be able to work on it. You can also add a customer’s IP address here, if you know it.
Lastly, you can choose how the Under Construction page looks to those that visit your URL before you’re ready to go live. You can take the default text, put in other text, or choose to show all your own HTML. Choose the option that fits best for you, and hit the “Save Changes” button and you’re set.
Conclusion
Now you’re ready to get to work on your new WordPress powered website without having to be concerned about whether someone’s going to see the work in progress.
Enjoy!


